
For those of you who followed the article on ICS update for Nexus S and wanting to receive the official OTA ICS 4.0.4 update, but worried that you may not get it; or hated ICS and just wanted to get back to Gingerbread — don’t despair. We have a list of easy to follow instructions that you can use to revert your handset back to its factory default OS.
Unfortunately the instructions were not that easy compared to when you updated your phone. This also requires rooting your phone, but don’t worry after reverting back it will be unrooted again as if nothing happened. As long as you follow the guidelines correctly, this whole process should not take more than 15 minutes.

Fair Warning: This is not for the faint-hearted. This is also not for trigger-happy users. Lastly, it is not our fault if something bad happens to your Nexus S. We wrote this because it worked for our devices by following simple instructions and making sure that each are done correctly. YugaTech is not responsible for any damage that these procedures will cause to your smartphone. Good luck!
Before we all get too excited, I want you to take this opportunity to back-up your important files on your device. Just in case anything happened to you (just kidding) or your phone, at least you were able to back your files up. When that’s done, here’s some app/software that you may want to download first before we proceed. (This may also give you some more time to rethink if you really want to do this).
1. Make sure that all necessary Nexus S drivers are installed on your PC. Download and install “Google USB Driver for Windows Revision 4†and PdANet driver here.
2. Download FastBoot and ADB to your computer. You can download these here.
3. Download the SuperUser zip file here.
4. Download Clockwork Recovery here.
5. Determine what OS came pre-installed with your Nexus S. For the most part it’s 2.3.6. If it is you can download the official OS here.
6. If your handset came with a different OS, skip step 6 and visit this site. Browse through available OS and find one that suits your device.
If you have come this far, then you’re really determined to revert your OS back. This is the last chance to walk away from this. Should you wish to continue, proceed to Step 7. Good Luck!
7. Extract FastBoot & ADB and Clockwork Recovery on a “new folder†on your desktop.
8. Open the “new folder†directory where ADB & FastBoot are. Then open “Androidâ€. Copy the path on the address bar. You should have something like this: C:\Users\DV6t-6000\Desktop\New folder\Android.
9. Go to your Computer properties (Start> Right-Click Computer > Click Properties), Click advance system settings > Environment Variables.
10. Under system variables, look for “Path†and double click it. Then go to the end of the string and paste the copied path with a semi-colon (;) before it. It should look like this ;C:\Users\DV6t-6000\Desktop\New folder\Android. Confirm the action by clicking OK. Click on OK for the system to take the changes made. And another OK to close the System Properties.
11. Connect your phone to your PC. Then select “Turn On USB Storage†on your device.
12. Copy the Superuser-3.0.7-efghi-signed.zip on the main folder of the phone’s memory.
13. Copy downloaded OS on the main folder of the phone’s memory.
14. Open up command prompt on your computer.
15. Turn your phone off and boot to FastBoot by pressing the power button and the volume up key at the same time. The FastBoot should like this:
On the command prompt type in “fastboot oem unlock” then press Enter. Your command prompt should look like this:
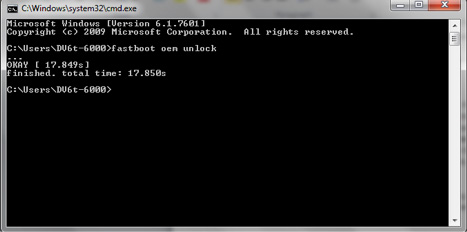
If we have the same screen you’re on the right track but If not, I’ll help to get you back on track if you take note of what you’re seeing and/or send a screenshot to my email.
16. You’ll get this disclaimer if you were able to follow the instruction so far.
Select Ok and just let the device to take the changes made. Don’t try to use your screen when selecting an option. Always use the up and down key for toggling and power button for confirming.

17. You’ll be routed back to the FastBoot screen. This time however, you’ll see that the Lock State of your device is now in red and says UNLOCKED.
18. Open the “new folder†then copy the path on the address bar.
19. On the command prompt, type this is in: fastboot flash recovery, then paste the copied path and add this \recovery-clockwork-5.0.20-crespo.img then press Enter. You’re command prompt should look like this:
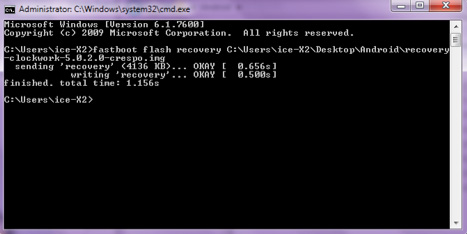
If we have the same screen you’re on the right track but If not, I’ll help to get you back on track if you take note of what you’re seeing and/or send a screenshot to my email.
20. Ungplug the device. Then turn it off by selecting the “off†option, then reboot to FastBoot by repeating Step #15.
21. Choose Recovery on the selection. Wait until the phone has rebooted to Clockwork Recovery.
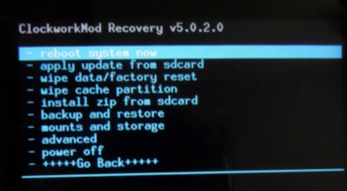
22. Scroll to “install zip from sd cardâ€. Then select “choose zip from sd cardâ€.
23. Select Superuser-3.0.7-efghi-signed.zip and confirm the action and let the phone take its course. (at this part of the procedure, you’re phone is now rooted.)
24. Go back to the main Recovery Menu
25. Select wipe data\factory reset and confirm action by selecting Yes – delete all user data
26. Select wipe cache partition and confirm action by selecting Yes – Wipe Cache.
27. Repeat Step #21.
28. Select the downloaded OS (1ada25375426.signed-so ju-ota-189904.1ada2537) and confirm action by selecting Yes – Install 1ada25375426.signed-so ju-ota-189904.1ada2537.
29. Wait till actions are done. You’ll see a prompt “Install sdcard complete”.
30. Go back once and Select reboot system now. You’ll now have Gingerbread OS back on your Nexus S. Now all you need to do is lock the bootloader again by repeating Step #15.
31. Once on the FastBoot, type on your command prompt “fastboot oem lock”.
I cannot further emphasize that performing these steps should be taken seriously and with caution. We will not be responsible for any damage on your device.
In the course of writing this article I have tested this method numerous times, on three different computers (2 laptops and 1 desktop) with different configuration and Windows 7 version and all attempts were successful.
I also took the initiative to have some of my friends who are not so tech savvy and have not tried to root, unlock and even upgrade their handsets OS and their attempts were successful as well. If ever you come across any issues please let me know and I’ll try to help you out. I hope that everything will turn out well on your attempt.


I’ve seen photos of the new theme… ME LIKEY…
Also, I searched google for some known issues with 4.0.4 and found a network signal issue. But it turns out to be an issue for GSM Nexus not Nexus S.
Another is, my Music Player was upgraded to Google Play Music (golden headset icon), a new app, Play books, and found out that these are incorporated in 4.0.4 and came to my phone ahead of 4.0.4 XD