
Back in the days when disk drives were slow and bulky and owning a high-speed and high-capacity drive would require an arm and leg (sometimes even a kidney), some people resorted to setting up multiple drives in RAID configuration. If you don’t know what RAID is or you just want to have better understanding of the various types of commonly-used RAID setups, then this post is for you.
To kick thing off, let’s define what RAID is. Depending on who you’re talking to, RAID can either stand for Redundant Array of Inexpensive Disk or Redundant Array of Independent Disk – any of the two is ok though.
In a nutshell, RAID is the term used to describe the method of combining multiple drives to either achieve better performance (increased read and write speeds), or create a fail-safe if something goes wrong with one of the drives.
Now that we have the basics squared up, let’s check out the different types of commonly-used RAID configurations and how these will increase the reliability and/or performance of your disk drives.
RAID 0, or as some people call it Striping, is a RAID configuration that requires at least two hard drives to setup. What it basically does is that it allows data to be stored across all of the drives that are configured in RAID 0, resulting to a faster read and write speeds as opposed to a single drive.

By configuring two hard drives in RAID 0, the amount of time it takes to read and write data on those drives will, theoretically, be cut in half. In essence, more hard drives you configure on RAID 0 will result to faster read and write speeds, and more storage capacity as illustrated above (2x 120GB hard drives configured to RAID 0 is still equivalent to 240GB).
The downside to RAID 0, however, is RELIABILITY. Since the data are spread out to all of the drives, if one of the hard drives fail, then you’re data is as good as gone, unless you perform regular back-ups.
This is where RAID 1 comes in. Instead of giving you faster drive performance, this configuration gives you peace of mind that all your data will be safe and sound in the event that one of your drives that are configured in RAID 1 starts acting up.

Rather than copying portions of your data and spreading it across all of the drives, the system copies the whole data (not portions of it) on one of the drives that are configured on RAID 1 and duplicates the data on the other drives, hence the alias Mirroring.
The drawback here is that you only get the capacity of one hard drive (120GB + 120GB in RAID 1 is only equivalent to 120GB), so regardless of how many hard drives you set up, the storage headroom you’re going to get will still be the same.
Furthermore, hard drives that are configured in RAID 1 tend to have, in most cases, slower read and write speed as opposed to non-configured drives which is understandable since it will take longer time for the system to finish writing the data on one drive and mirroring it on the other RAID 1 drives.
The RAID 5 configuration is, in some parts, similar to how a RAID 0 configuration works in a sense that it stripes the data to all of the drives in the setup. It has, however, an extra feature called Parity which addresses the RAID 0’s susceptibility to data loss by having the ability to rebuild a block of data if one of the drives break down.
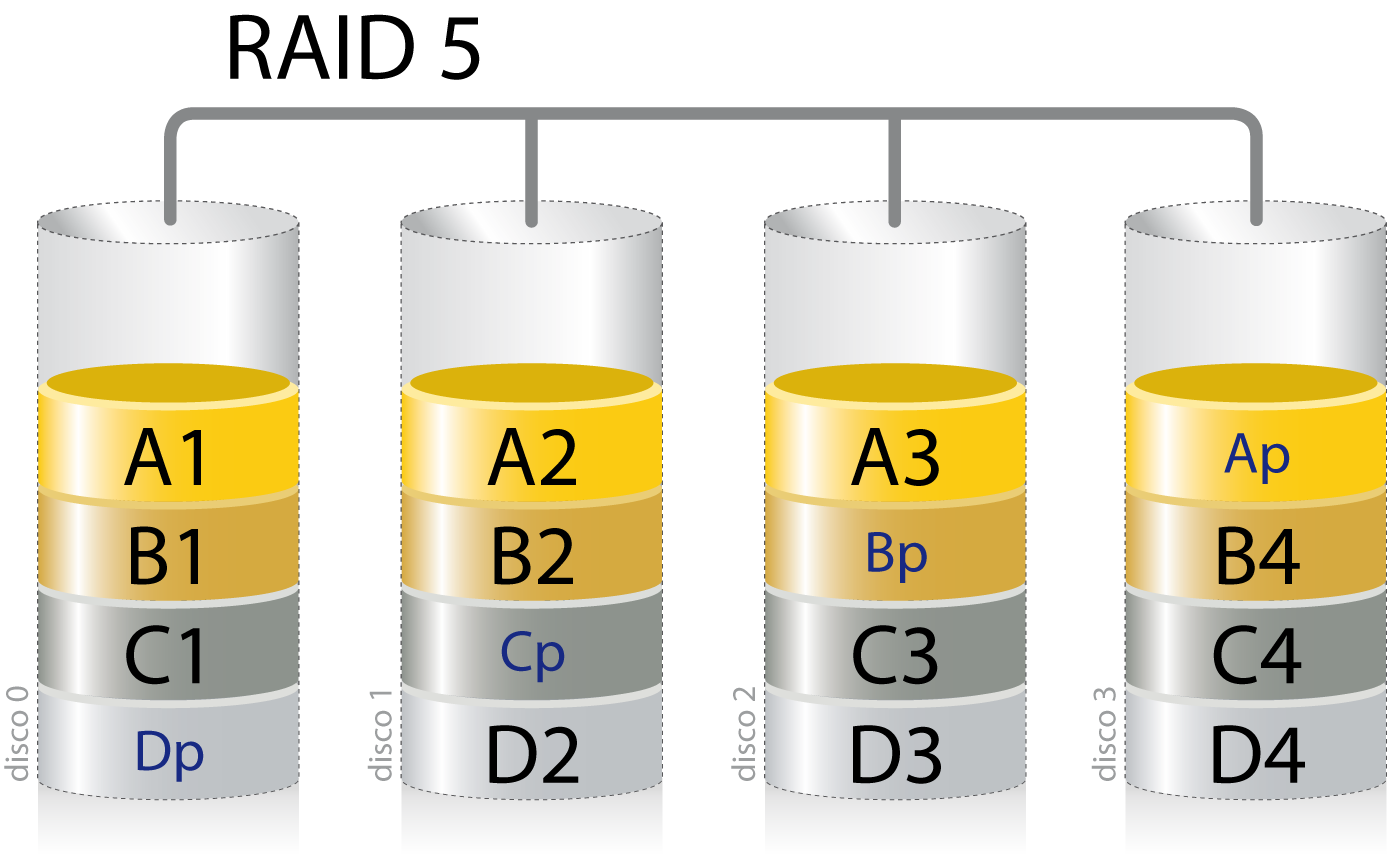
It is regarded by many as the most cost-effective RAID configuration as it provides users with increased performance, at same time it provides some level of protection in case one of the drives goes bad. But instead of requiring a dedicated Parity drive like in RAID 3 and RAID 4, RAID 5 distributes the parity blocks across all of the drives in the setup.
RAID 10, or RAID 1+0 as its name (or numbering which ever you want to call it) implies, is a combination of RAID 1 and RAID 0, hence the Stripe of Mirrors moniker. This nested RAID configuration requires at least four (4) hard drives to setup, but in return gives users the best of both worlds as far as performance improvements and reliability are concerned.

In this setup, two hard drives are paired to one another and are setup in RAID 1 configuration which, in essence, only gives you half of the total capacity that you’d normally get if the drives were not configured. So basically you have four hard drives that are treated as two.
These drives are then setup for RAID 0 configuration which stripes the data on each of the two RAID 1-configured drives and then mirrored to prevent data loss if one of the drives go haywire. There is still the danger of losing your data if two paired drives break down, but the chance of that happening is slimmer compared to just having your drives configured on RAID 0.


Quoting:
“Furthermore, hard drives that are configured in RAID 1 tend to have, in most cases, slower read and write speed as opposed to non-configured drives which is understandable since it will take longer time for the system to finish writing the data on one drive and mirroring it on the other RAID 1 drives.”
From my understanding write will usually be slower dependent on the BUS of the RAID controller. If the RAID controller can handle the maximum speed of the hard drive then there is no slow down from a standard single disk write. On the other hand, read is suppose to be faster if not the same as a standard drive depending on the RAID controller again if it utilizes parallel sequential read on both drives.