
Filters are just some of the tools we use to make our Instagram or Facebook content more engaging. But if you want to stand out, why not make your own? Yep, that’s possible, so let us show you how.
CREATE YOUR PROJECT

In my experience, creating a filter is complicated, but the difficulty depends on how elaborate your idea is. If you want to stick to something easy, you can create a lot of effects in Spark AR that won’t require you to animate anything.
STEP 1: Download & install the latest version of Spark AR Studio onto your computer. It’s available for both Mac and Windows.
STEP 2: Once installed, you’ll be greeted by a screen that has a ton of starter pack projects to explore. Choose what suits you.
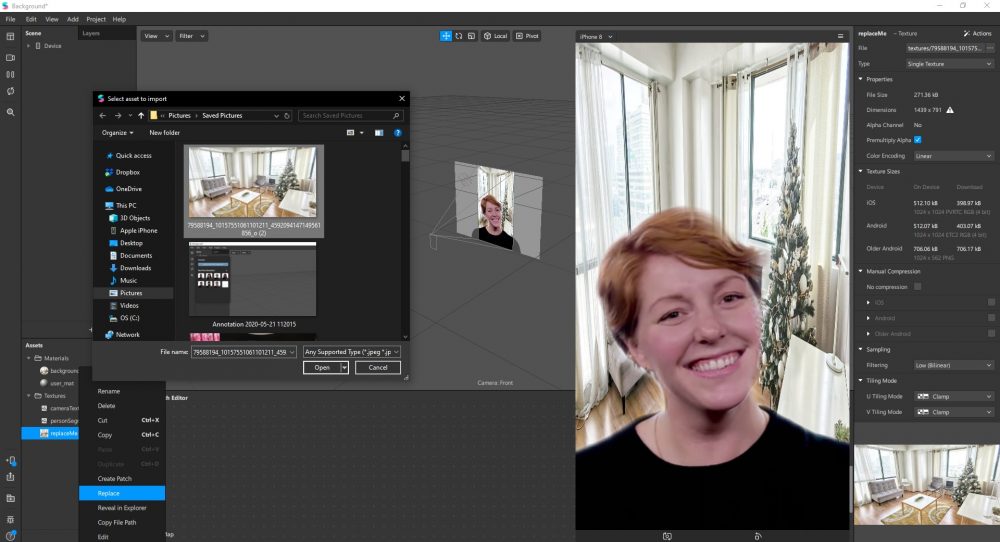
For starters, I decided to make a Background filter since it’s easy:
STEP 3: In the “Assets” board on the left side of your screen, right-click “replaceMe.”
STEP 4: Tap the “Replace.”
STEP 5: Open file and choose your preferred background you want to see in your AR Filter.
Spark AR includes several test faces for you to try your filters on. You’ll be able to see how they look on people of different genders and ethnicities. If you want to try it on yourself, choose “USB Webcam” or whatever webcam name you have, and you’ll be able to build a filter on your face.

SAVE YOUR AR FILTER
To upload your AR filter:
STEP 1: Go to “File”
STEP 2: Tap “Upload to Spark AR Hub”
STEP 3: Wait to render the “Platform Requirements”
STEP 4: Tap “Upload”
After you tap the “Upload,” Spark AR Studio will lead you to the browser of Spark AR Hub, where you need to choose where you want to upload your AR Filter — Facebook or Instagram, and then fill up the rest. Also, make sure you’re logged on to the Facebook / Instagram account where you want to publish the effect.

Once that is done, all you need to do is wait for your filter to be approved. If you’re feeling extra, you can try animating 3D objects. There’s an entire library of preset elements available, or you can create one from scratch.
Here’s another way to make your filter. In this case, I’m making my makeup filter.

STEP 1: Open your Spark AR Studio
STEP 2: Select “Blank Project”
STEP 3: Right-click “Focal Distance”
STEP 4: Tap “Add” and select “Face Tracker”
STEP 5: Select “facerTracker0” then right-click select “Face Mesh”
STEP 6: After selecting “Face Mesh” go to the right side of the studio, look for “Materials” and tap “+”
STEP 7: Now go to the left side of the studio, under the “Assets” click “material0”.
STEP 8: Again, on the right side, look and tap “Shader Type,” then select “Retouching.” You can adjust how smooth your face should be.
Don’t save it yet, though, as you need to add your preferred makeup filter. It’s a plus if you know how to edit using Adobe Photoshop so that you can customize it.
STEP 9: Again, right-click the “faceTracker0” then select “Face Mesh.”
STEP 10: Go to the right side of the studio, look for “Materials,” tap “+” and select “Create New Material”
STEP 11: Now go to the left side of the studio, under the “Assets” click “material1”.

STEP 12: Again, on the right side, look and tap “Shader Type,” then select “Face Paint.”
STEP 13: Now, under “Shader Type” select the “Face Paint”
STEP 14: Then you will see “Texture” and select “Choose file” then open your chosen filter. Make sure your file is in a PNG.
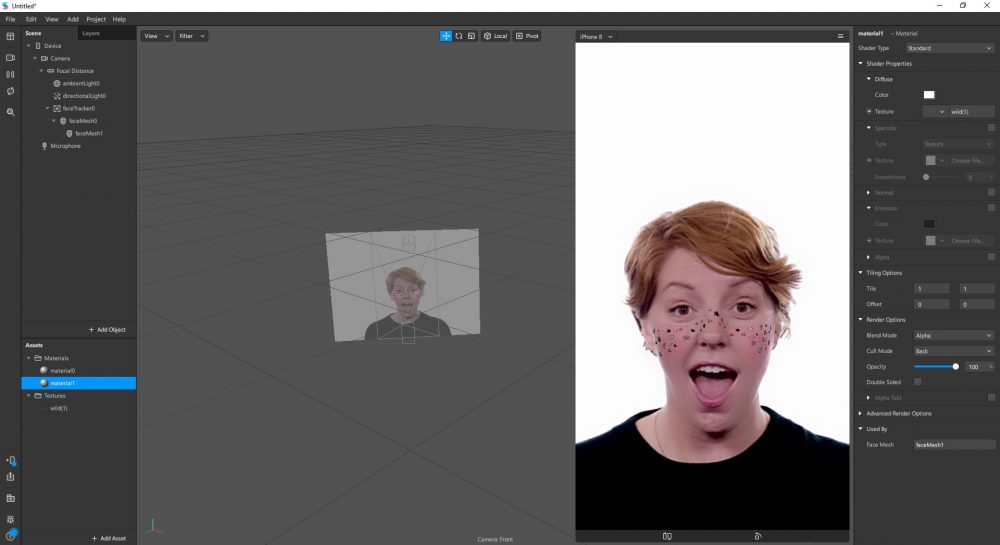
Then there you have it! You now have your customized filter. If you don’t know how to use Adobe Photoshop, you can also look for one at Pinterest or Google, but make sure it’s in a PNG file.
And there you have it. You can create custom filters for personal use or promote a brand or cause.
Also, don’t be scared of exploring the Spark AR Studio. It might be confusing at first, especially for those people who are not familiar with graphic editing programs such as Cinema 3D or Adobe Photoshop. But TRUST ME, once you get used to it, it’s worth playing around.


0 Comments
Leave a Reply