
Facebook made people more connected than ever. It became a platform not only for socializing but also for keeping up communication with clients, colleagues, and other professionals you work within the same field. As a representation of your identity and your company that you work with, it is a no-brainer to do some Facebook Spring Cleaning in your account. And yes, this is also applicable even if you have a separate account for work and personal use.

To understand the importance of Facebook Spring Cleaning, you need to know the definition first. The term refers to profile cleaning and deletion or hiding of posts on your timeline including status, photos, videos, and other content that can be posted on Facebook. Done usually during spring, this allows users to customize the viewers of their posts and the kind of content to paper in their news feed. And since social media has become one of the most interactive platforms for sharing anything under the sun (including ugly photos and videos even from the past), it is just right to declutter your social media presence.
Here are some easy and basic steps on how to do it on desktop and mobile:
Decluttering your friends’ list
This one could be one of the most tiresome jobs among the list since you’ll need to input the names of your friends manually. You’ll also need to access your Facebook account on a desktop to navigate the ‘Friend List’ feature. On the other hand, it makes customizing and editing some of the functions listed below easier than ever.
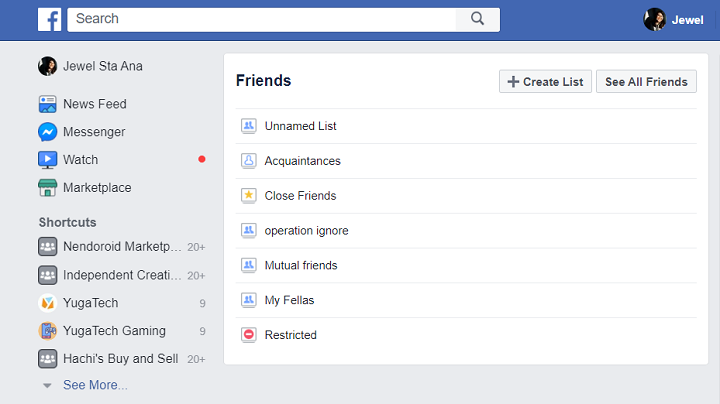
Step 1: Go to your home page and locate the Friends List under Explore located on the left side of the page.
Step 2: Create a list, customize its title, and add members on it.
Note: You may also see the latest posts of the members on your list.
Hiding posts and tagged photos
Got some embarrassing drunk photos/videos tagged with you? Do you want to express your grievances about the government without getting into a fight with your solid DDS relatives? Worry no more. Facebook has a special feature that allows users to hide their posts and tagged photos to certain people.
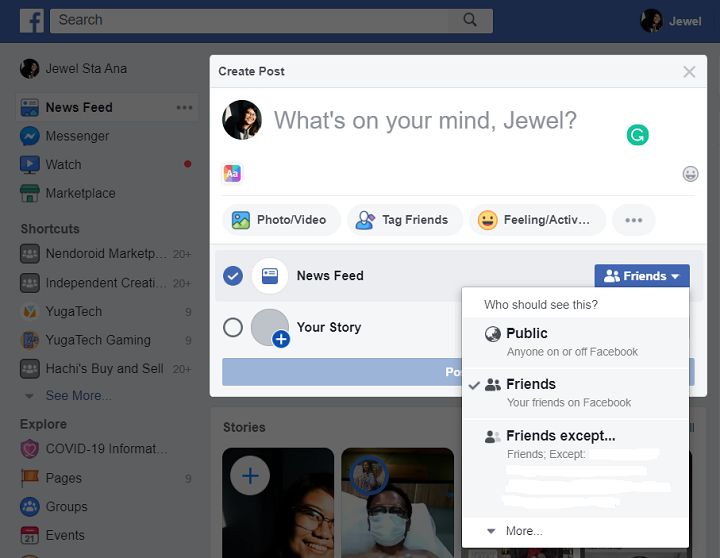
To control viewers of your posts
Step 1: Proceed to your home page and navigate the status bar.
Step 2: Go to the Friends dropdown list and select ‘Friends Except’.
Note: You may also select other viewers from the Friends List.
To hide tagged photos
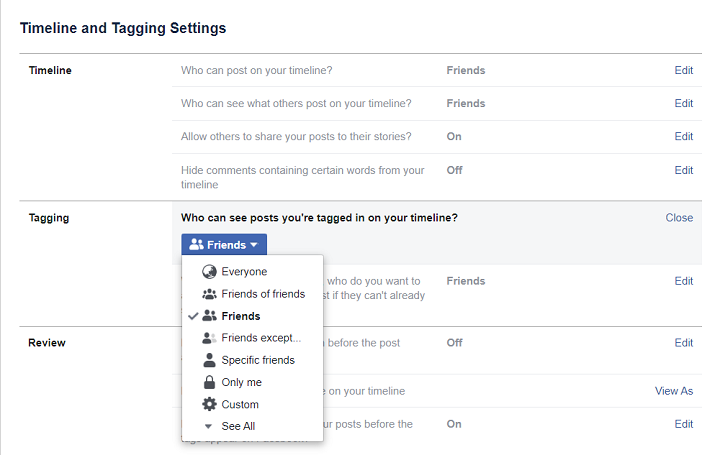
Step 1: Go to Settings and select ‘Timeline and Tagging’.
Step 2: Click the ‘Who can see posts you’re tagged in on your timeline?’ and choose among the list of viewers.
You may select the ‘Friends Except’ list if it has the same group of people you want to hide your tagged photos from. To add more people, you may choose the ‘Custom’ option and type their names. Don’t forget to save the changes made.
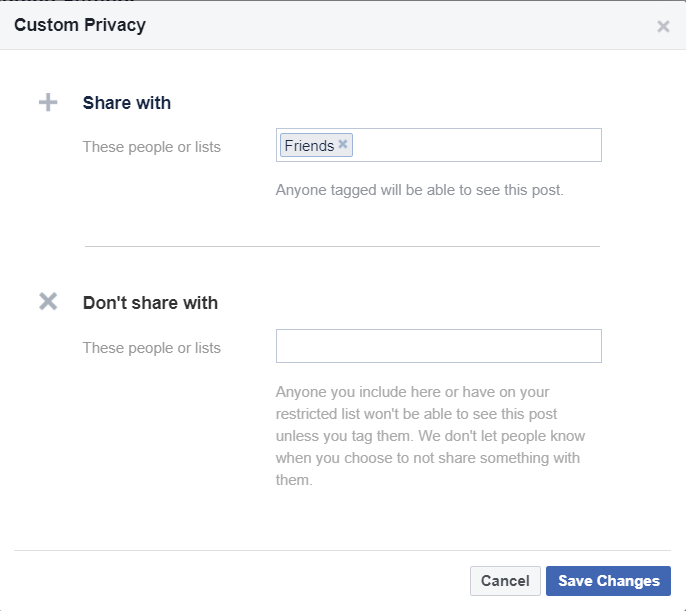
Should you want to share your posts and tagged photos to a very few people, you may add their names under the ‘Specific Friends’ window.
Restricted List
Another way to hide your posts is by adding the person on the Restricted List under the Blocking Settings. So, what’s the difference between the ‘Friends Except’ feature and the Restricted List? While the former still grants to see your posts shared with friends and public, the latter plainly shows only your public posts without unfriending the person. Sounds ideal for your boss and ex, right?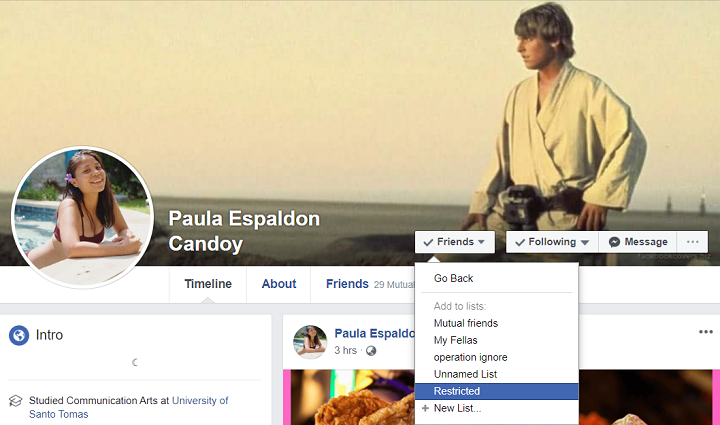
Step 2: Hover over the Friends dialog box at the top of their profile.
Step 3: Select Add to another list…
Step 4: Select Restricted
Unfollowing a friend’s posts
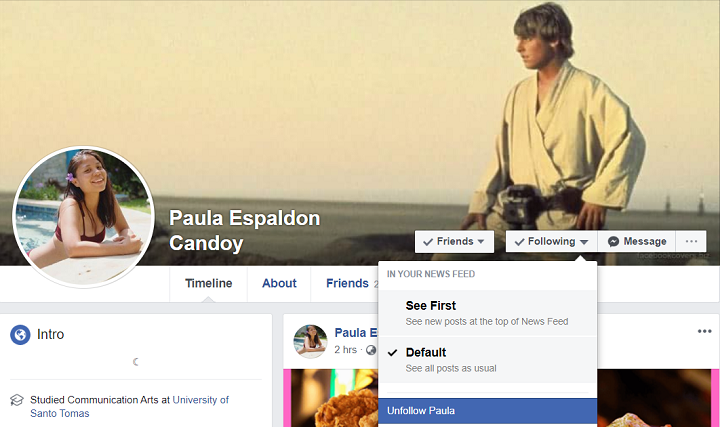
Taking out all of the fake news and toxic positivity posts from your newsfeed isn’t tiresome as it seems. You can unfollow a certain friend without him/her knowing it by going to his/her profile and clicking the ‘Unfollow’ button under the ‘Following’ dropdown box.
Controlling your timeline
Unknown to many, Facebook provides a set of controls to moderate the content of your timeline. This includes the people who can see and post on your timeline. Under the Timeline and Tagging Settings, you can also restrict people in sharing your posts to their stories, hide comments with specific keywords on your timeline, and review tagged posts and photos.

To manage who can post and see your timeline
Step 1: Go to Settings>>>Timeline and Tagging>>> Timeline
Step 2: Select ‘Who can post on your timeline‘ and ‘Who can see what others post on your timeline‘.
Step 3: Set and save changes.
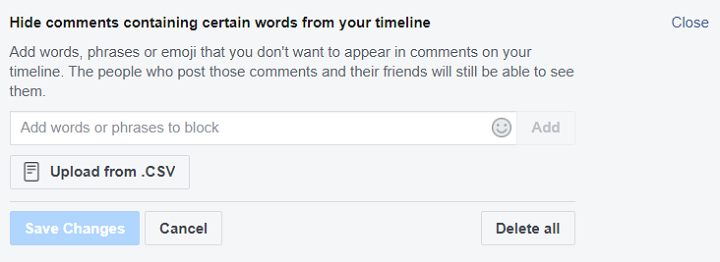
To hide comments containing keywords
Step 1: Go to Settings>>>Timeline and Tagging>>> Timeline >>> Hide comments containing certain words from your timeline
Step 2: Select the set of keywords to block and hit Save Changes.
Note: This feature only blocks the comment on your timeline, not on the commenter or their friends’ timeline.
Blocking users, messages, pages, apps, and invites
The majority knows how blocking for other accounts works. Sometimes, this is how ex-lovers or ex-friends burn their bridges digitally. However, users can also block annoying apps and event invites, messages and video calls from cat-callers and stalkers, spiteful pages and be gone on their sight forever. Blocking apps protects users from getting their data shared through Facebook.
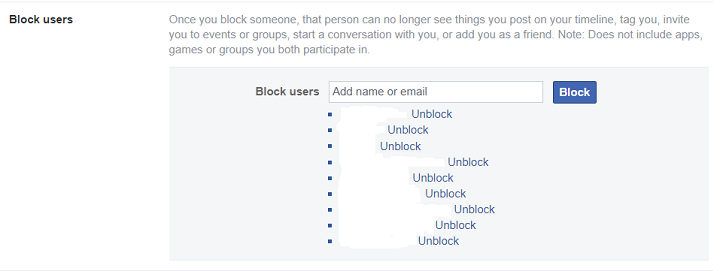
To block someone
Step 1: Go to Settings>>>Blocking>>> Block users
Step 2: Type the name of the person you don’t want to see your profile.
Step 3: Click the name when the results appear.
Note: Once the person is blocked, he/she can no longer see and tag posts on your timeline, send invites to events or groups, start a conversation, and add you as a friend.

To block messages and video calls
Step 1: Go to Settings>>>Blocking>>> Block messages
Step 2: Type the name of the person you don’t want to receive messages/video calls from in the text box.
Step 3: Click the name when the results appear.
Note: Blocking someone in the Messenger app does not automatically mean that you’re blocking their profile.

To block app invites
Step 1: Go to Settings>>>Blocking>>> Block app invites
Step 2: Type the name of the person you don’t want to receive app invites from in the text box.
Step 3: Click the name when the results appear.
Note: Once you block app invites from someone, future app requests from him/her will be ignored automatically. To block invites from a specific friend, click the ‘Ignore All Invites From This Friend’ link under your latest request.

To block event invites
Step 1: Go to Settings>>>Blocking>>> Block event invites
Step 2: Type the name of the person you don’t want to event invites from in the text box.
Step 3: Click the name when the results appear.
Note: Once you block event invites from someone, future event requests from him/her will be ignored automatically.

To block apps
Step 1: Go to Settings>>>Blocking>>> Block apps
Step 2: Type the name of the app invites from in the text box.
Step 3: Click the name when the results appear.
Note: Once you block an app, it will no longer have access to your shared data on Facebook.
And that sums up the basics of Facebook Spring Cleaning. Stay vigilant on what you share online and do this often to ensure your data privacy. How was your Facebook Spring Cleaning experience? Let us know in the comments below!


0 Comments
Leave a Reply