
Now that we have a better grasp of what are the different shooting modes, let’s now look in to another aspect of our camera that’s often been disregarded but very crucial in nailing the perfect shot; White Balance.
To be honest, it’s only recently that I’ve tried exploring my camera’s White Balance feature. I can’t quite point my finger as to why I never bothered to spend more time in learning this, but I think it has something to with the lack of proper introduction about it. I assume that this is also the case for most self-taught users, which is why I decided to share some of the things I learned about this often misunderstood facet of photography.
Definition
TechTerms.com defines White Balance as a functionality of a camera that “defines what the color white looks like in specific lighting conditions, which also affects the hue of all other colors.” In other words, our cameras ability to identify what is white changes with the increase/decrease of intensity of the light source and it has an impact on the other colors in our composition.
By nature, our eyes are trained to cope with different lighting situations which allow us to accurately identify the color hue of the things around us. Unfortunately, this is not the case for most cameras, which is why some cameras are equipped with various White Balance presets allowing users to guide the camera to the right white in certain lighting conditions.
White Balance presets
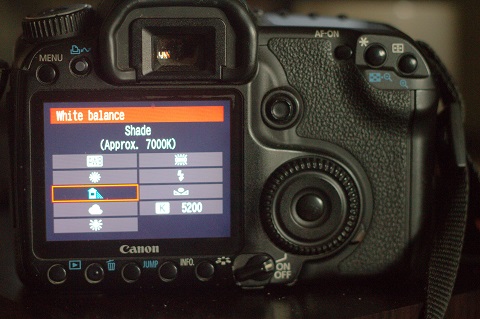
A camera’s White Balance is set to Auto by default and is oftentimes left at that by most users for the entire duration of the camera’s life. And while there’s nothing really wrong with using AWB as oftentimes most cameras are able to hit the sweet spot on this setting, there are instances when it does not, which leads to a slightly off-colored image. Therefore users are only at the mercy of the camera’s ability to gauge the current lighting condition which can be hit or miss especially when outdoors where lighting changes constantly.
This is exactly why we need to at least have a bird’s eye view of other White Balance presets in our camera in order to achieve desired results.
With the exception of AWB, there are typically 8 White Balance presets that are available at your disposal and are displayed on the camera’s settings as symbols. Below is a chart that shows the different presets usually found on your camera, its description and its respective color temperatures.
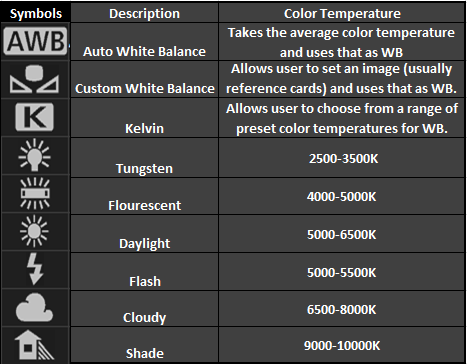
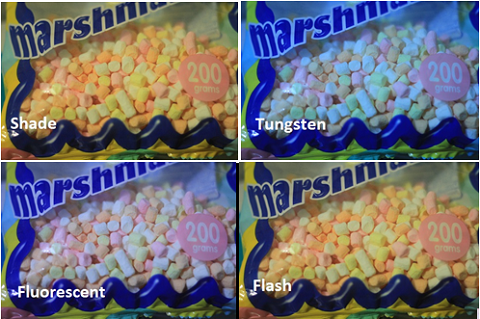
Whenever you’re dealing with color temperature, the rule-of-thumb is that lower numbers produce bluish tint/hue while higher numbers produce yellowish hue/tint. Just to show how each presets affects the end result, here’s an image shot at different White Balance settings.
[fancygallery id=”5″]
Application
The funny thing about White Balance is that there’s no right or wrong setting for it. So what this means is that you can Shade preset on particularly sunny day if you’re gunning for a warmer shot or shoot with Tungsten on a cloudy day to add a bit of twist on your composition. Bear in mind that the whole point of this post is to get you out of the AWB box and try out other WB presets on your camera and see if it fits the result you’re aiming for, whether that be more in the warmer side or the other way around.
In my opinion, the quickest way to learn the different WB presets is to shoot in RAW (that is if your camera supports it). Shooting in this format allows you to apply the desired White Balance even after picture is taken. This also saves you the trouble setting the camera’s WB on a certain preset before taking the shot. Once you get the hang of it, I’m confident that you’ll be able gauge the current lighting condition you’re in and choose the desired WB at will.
Summary
Just like any electronic device out there, cameras also have its fair share of limitations, especially when it comes to consistently identifying what white is in different lighting scenarios. Since our cameras can’t do it themselves, we need to tell them what is white how white it should be. And we can do that by understanding White Balance and its various presets. It can be quite tricky, but I can assure you that it’s worth learning.


please, Next is ISO and EXPosure! :D